First Android Application.
In this tutorial we are going to create First Android Application.
Before creating our First Android Application make sure that you have
setup your Android Development Environment, if not refer tutorial Android
- Environment Setup Tutorial. I also assume that you have a little
bit working knowledge with Eclipse IDE.
1. Create Android Application.
- Open your eclipse which has been configured with Android SDK.
-
Choose File -> New -> Project. In the New Project Wizard select Android Application Project and click Next.
-
New Android Application Wizard appears in which give your Application Name as "First Android Application" using wizard window as follows.
-
Next, follow the instructions provided and keep all other entries as default till the final step. Once your project is created successfully, you will have following project screen.
2. Anatomy of Android Application.
Before you run
your app, you should be aware of a few directories and files in the
Android project:
-
AndroidManifest.xmlEvery Application must have an AndroidManifest.xml file in its root director. The manifest presents essential information about the application to the Android System, information the system must have before it can run any of the application code.
-
srcThis contains all your Java files required for our application.
-
resThis contains all your resource required for our application. res contains other sub directories.
-
drawableContains Images for our Application.
-
layoutContains all your layout files in which we will construct our Views.
-
valuesContains Strings, Styles, Colours required for our application.
-
-
genIt contains R.java file, it is a auto generated file that references all the resources found in your project. It acts as the bridge between our src and res.
-
binOnce we Run our application bin gets generated which contains .apk file generated by our ADT.
3. Running the Android Application.
To Run our Android Application we
require,
- Android Emulator (or)
- Android Mobile.
3.a) Running the Android Application Using
Emulator.
To Run Android
Application first we need to Create One Android Emulator (Android
Virtual Device). Follow the steps to Create New AVD (Android
Virtual Device).
-
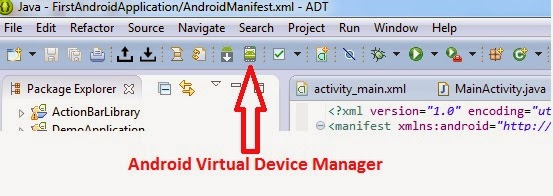
Click Android Virtual Device Manager in Eclipse.
-
In Android Virtual Device Manager Wizard Click "NEW" to create New AVD (Android Virtual Device).
-
In Create New Android Virtual Device (AVD) Wizard give all required information and click OK to create New AVD.
NOTE : On Windows, emulating RAM greater than 768M may fail depending on the system load. Try progressively smaller value of RAM if the emulator fails to launch. -
We have successfully created AVD (Android Virtual Device).We are now ready to Run our first android application. Right Click on Our Project -> Run as -> Android Application. To Run our First Android Application.
Android Emulator will launch with our First Android Application. Android Emulator will be slow and takes some time to launch.
We have successfully run our First Android Application using Android Virtual Device (AVD).
3.b) Running the Android Application Using
Android Mobile.
If you have a real Android-powered device,
here's how you can install and run your app:
-
Plug in your device to your development machine with a USB cable. If you're developing on Windows, you might need to install the appropriate USB driver for your device. For help installing drivers, see the OEM USB Drivers document in Android Developer Website.
-
Enable USB debugging on your device.
-
On most devices running Android 3.2 or older, you can find the option under Settings > Applications > Development.
-
On Android 4.0 and newer, it's in Settings > Developer options.Note: On Android 4.2 and newer, Developer options is hidden by default. To make it available, go to Settings -> About phone and tap Build number seven times. Return to the previous screen to find Developer options.
To Run our Application, . Right Click on Our Project -> Run as -> Android Application. Eclipse installs the app on your connected device and starts it. -
References
http://developer.android.com/training/basics/firstapp/creating-project.html
http://developer.android.com/training/basics/firstapp/running-app.html
http://www.tutorialspoint.com/android/android_hello_world_example.htm


